Getting Started
Welcome to getting started with the Automatic Rostering service!
In these pages, we will guide you from zero to hero with the use of the API, and you will find out-of-the-box payloads you can use as a helpful guide in establishing your service.
To help you effectively start using the Automatic Rostering API, we've developed a series of training scenarios ranging from basic to advanced. Here's the content we will uncover:
-
Scenario One: Basic Rostering:
- Learn to set up a simple roster using default shift patterns and employee data. This will be your first automated shift roster with minimal custom parameters.
-
Scenario Two: Handling Employee Preferences
- Integrate employee preferences into your rostering. This involves managing requests for days off and preferred shifts, demonstrating how to balance employee satisfaction with staffing needs.
-
Scenario Three: Complex Demands and Compliance
- Focus on meeting complex staffing demands and compliance requirements, such as varying employee qualifications, labor laws, and contractual obligations.
Scenario One: Basic Rostering
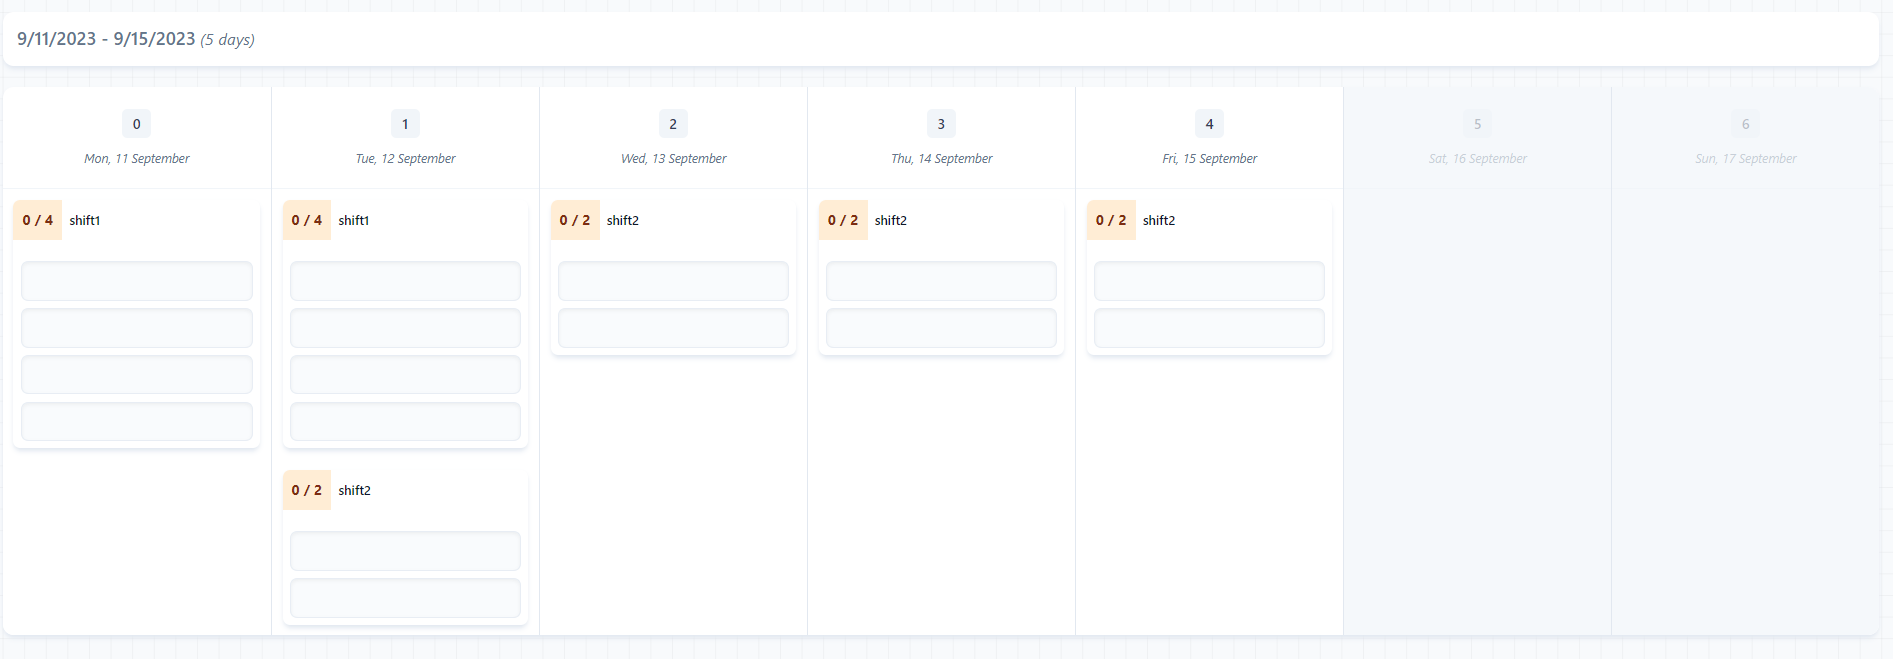
We will start with a simple example, a roster for a week, that has 2 shifts, and 6 employees.

In this payload, we define shift1 and shift2. They are shifts, that need to be covered by employees. We need 4 employees to cover shift1, and 2 employees to cover shift 2. To start defining the payload, we can define two shifts in the "shifts" property of the payload:
 "shifts": [
   {
     "id": "shift1",
     "intervals": [
       {
         "startTime": "07:00",
         "endTime": "16:00",
         "dayIndicator": 0,
         "workTypeId": "1",
         "breakMinutes": 60
       }
     ]
   },
   {
     "id": "shift2",
     "intervals": [
       {
         "startTime": "08:00",
         "endTime": "17:00",
         "dayIndicator": 0,
         "workTypeId": "1",
         "breakMinutes": 60
       }
     ]
   }
 ]
Explanation:
- Shifts defined with "shift1" starting at 07:00 and ending at 16:00 with a one-hour break, and "shift2" starting at 08:00 and ending at 17:00 with a one-hour break.
- DayIndicator is set at 0 - it specifies which day the shift belongs to. If that doesn't make any sense to you, you can safely ignore it and just always specify 0
- This would also be the place to specify shift templates, which there is no tutorial for just yet, but you can read more here.
For the work type, that is just to be able of tweaking "the value" of working minutes. It has to be specified in the payload, which we can do in the configuration.
Most of the time, you will just need a configuration like this:
  "configuration": {
    "workTypes": [
      {
        "id": "1",
        "name": "WORK",
        "factor": 1.0
      }
    ]
  }
The shifts now refer to the work type id, with name "WORK", which has a FTE-fulfillment factor of 1. This means that 1 min of work, contributes to 1 min of employee contract time. There can be scenarios where you want to have different work types, with different factors, to represent different types of work. For example, a night shift could have a factor of 1.5, to represent that it is more demanding than a day shift.
The rest of the payload defines 6 employees, and some configurations of the start and end date. The full payload is therefore:
{
  "jobInfo": {
    "id": "PeriodId",
    "organisationId": "ParentId",
    "scheduleType": "CALENDAR",
    "demandType": "SHIFT_DEMAND",
    "planningHorizon": {
      "startDate": "2023-09-11",
      "endDate": "2023-09-15",
      "fteStartDay": {
        "date": "2023-09-11"
      },
      "fteEndDay": {
        "date": "2023-09-15"
      }
    }
  },
  "shifts": [
    {
      "id": "shift1",
      "intervals": [
        {
          "startTime": "07:00",
          "endTime": "16:00",
          "dayIndicator": 0,
          "workTypeId": "1",
          "breakMinutes": 60
        }
      ]
    },
    {
      "id": "shift2",
      "intervals": [
        {
          "startTime": "08:00",
          "endTime": "17:00",
          "dayIndicator": 0,
          "workTypeId": "1",
          "breakMinutes": 60
        }
      ]
    }
  ],
  "employees": [
    {
      "id": "1"
    },
    {
      "id": "2"
    },
    {
      "id": "3"
    },
    {
      "id": "4"
    },
    {
      "id": "5"
    },
    {
      "id": "6"
    }
  ],
  "demands": [
    {
      "days": {
        "dates": ["2023-09-11", "2023-09-12"]
      },
      "shiftDemands": [
        {
          "shiftId": "shift1",
          "ideal": 4
        }
      ]
    },
    {
      "days": {
        "dates": ["2023-09-12", "2023-09-13", "2023-09-14", "2023-09-15"]
      },
      "shiftDemands": [
        {
          "shiftId": "shift2",
          "ideal": 2
        }
      ]
    }
  ]
  "configuration": {
    "workTypes": [
      {
        "id": "1",
        "name": "WORK",
        "factor": 1.0
      }
    ]
  }
}
With this payload, we can let the solver run (see Quickstart for more details on how to send the request), and inspect the results:

We had a pretty simple payload and our job was successfully executed. To see these values from the json response, we can start by getting an overview in the shiftDemandFulfillment section:
"shiftDemandFulfillment": {
  "totalFulfillmentStatistics": {
    "requestedHours": 128.0,
    "requestedShiftAssignments": 16.0,
    "plannedHours": 128.0,
    "plannedShiftAssignments": 16.0
  }
}
Which looks pretty good - everything was covered. As for the individual employees, when and where they are scheduled, is specified for each employee (showing 2 employees here):
"employeeOutcomes": [
 {
   "employeeId": "4",
   "totalPlannedHours": 16.0,
   "plannedDays": [
     {
       "shiftId": "shift1",
       "scheduleDay": {
         "date": "2023-09-12"
       },
       "preAssigned": false
     },
     {
       "shiftId": "shift1",
       "scheduleDay": {
         "date": "2023-09-11"
       },
       "preAssigned": false
     }
   ],
   "softConstraintViolations": []
 },
[...]
  {
    "employeeId": "2",
    "totalPlannedHours": 24.0,
    "plannedDays": [
      {
        "shiftId": "shift2",
        "scheduleDay": {
          "date": "2023-09-13"
        },
        "preAssigned": false
      },
      {
        "shiftId": "shift1",
        "scheduleDay": {
          "date": "2023-09-12"
        },
        "preAssigned": false
      },
      {
        "shiftId": "shift2",
        "scheduleDay": {
          "date": "2023-09-14"
        },
        "preAssigned": false
      }
    ],
    "softConstraintViolations": []
  }
]
Which aligns with the schedule we see in the image above:
- Employee 4 is scheduled for shift1 on 2023-09-11 and 2023-09-12
- Employee 2 is scheduled for shift2 on 2023-09-13 and 2023-09-14, and shift1 on 2023-09-12
Click onto the next page, and we will start adding more complexity to the basic payload.